When I was first using Bing Ads we were getting a lot of clicks, but very little conversion. When I dug through the traffic sources using Google Analytics, we were getting clicks from a lot of weird listings sites which looked like niche search engines, or sites full of articles, but there was always something a bit off about them. Although we tracked the clicks as coming through Bing Ads adverts, some of these sites didn’t even seem to run adverts on them.
It looked like we were running our adverts on spam sites, which were sending dodgy clicks through in order to make money from Bing Ads, from our ads.
Adverts on spam sites is not what I was signing up for. Before ditching Bing Ads entirely, I went on a dive through its settings to see if I could fix this problem. I found one simple setting to tweak that sorted out all of my problems and I’ve been a happy Bing Ads user ever since.
Ad Distribution
Like Adwords, Bing Ads has settings at the Campaign and Ad Group level and on the surface the settings are very similar. This setting is only shown at the Ad Group level.
To find it yourself, within Bing Ads click on a Campaign, then on an Ad Group within it, then the ‘Settings’ tab. Scroll down and under ‘Other settings’ click ‘Ad distribution’. By default when I’ve set up campaigns, or when I’ve copied them in from Adwords using Bing’s import utility, this has been set as “All search networks (Bing, AOL, and Yahoo search and syndicated search partners)”. This setting provided large amounts of spam traffic.
Change the setting to “Bing, AOL, and Yahoo search (owned and operated) only” and I’ve found we receive very decent traffic. This locks your adverts to only show on the properties listed, which are all high quality sites. You get less clicks, but they’re much, much better quality. As far as I can tell, all of the clicks we were getting from the ‘syndicated search partners’ were spam.
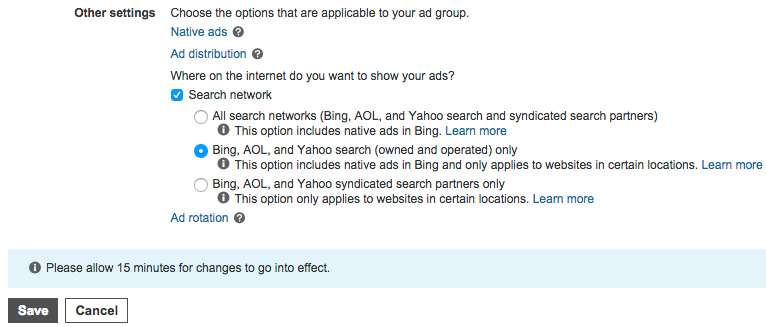
Change this setting for each of your Ad Groups and you too should see a great improvement in your click quality and conversion rate.
Bulk setting the Ad Distribution
If you use the Bing Ads web interface, you need to re-set the Ad Distribution in every Ad Group. This isn’t a problem if you’ve only got a few Ad Groups, but when I’ve imported large campaigns from Adwords, we often have a large number of Ad Groups to allow us to target adverts effectively. With a lot of Ad Groups, using the Bing Ads website to change each group is a painful amount of clicking. You can avoid all this by bulk changing the setting using the downloadable Bing Ads Editor (available for Windows and OSX.)
To do this, first download and install Bing Ads Editor. Use it to login to your account, it then downloads all of the account details.
Once Bing Ads Editor has all your account information, click on a campaign on the upper left pane, then ‘Ad Groups’ on the bottom left pane. This should give you a list of Ad Groups in the main view. Click on the top one, then hold down shift and click on the bottom one. This should select all of the Ad Groups at once.
Below the list of ‘groups is a set of drop down lists. Set the ‘Network distribution’ one to ‘Only Bing, AOL and Yahoo! websites’
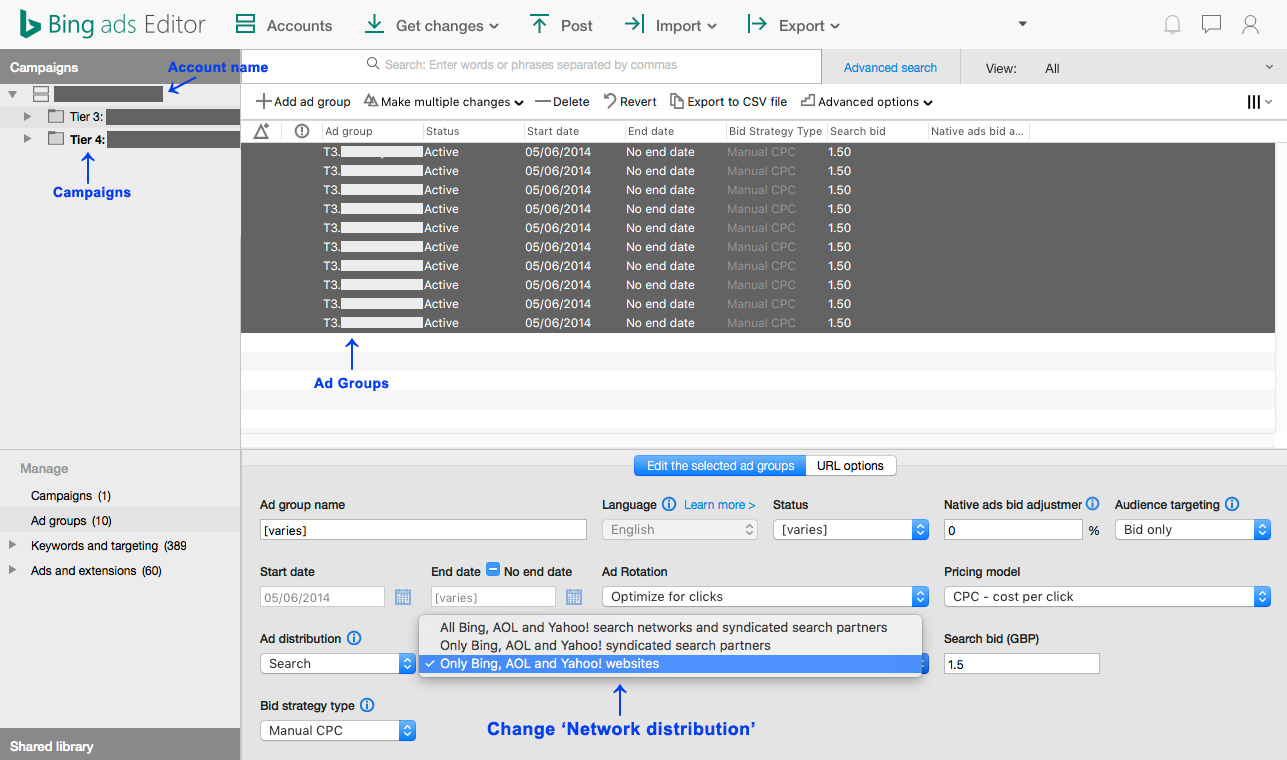
Do the same for as many Campaigns as you have. This isn’t quite over, you need to get the Editor to make the changes in your account…
Click on the account name at the top of the list of Campaigns on the top left pane, then click the ‘Post’ button in the top navigation. The Editor will then list how many changes there are to change in your account, click ‘Post’ to make the changes.
This single change saved us thousands in useless clicks. I’m sure it’ll do the same for you.